
Do-it-yourself tile flooring in photos and video instructions
The list of reasons convincing to lay ceramic tiles on their own includes not only economic preconditions that are fully justified at the cost of finishing work. It is sometimes very difficult to explain to the contractor what exactly the owner would like to receive as a result. So they pick up a spatula, a tile cutter and a rubber mallet, the real owners, without wasting their nerves, money, time for the services of migrant workers. In addition to these priorities, laying tiles with your own hands is a fascinating creative process, the result of which is not a sin to boast.
Content
The preparatory process and its components
The floor plane is tiled usually in rooms requiring intensive wet cleaning, often accompanied by the use of chemicals. Ceramics are needed where the floor suffers from water, from active movement, from mechanical shocks. These are kitchens, small and large hallways, combined or separate bathrooms. Definitely, laying the floor tiles with your own hands will not scare the future master with an excessively large amount of the treated area, but even this section of the apartment must be laid out perfectly, observing the entire list of technological requirements.

Iron self-confidence must be confirmed by drawing up a plan drawn on the exact dimensions taken directly at the facility. On the drawn plan, you must accurately indicate the location of niches, ledges, plumbing, doorways. A homemade scheme will help to accurately calculate the number of tiles.
The next step is a trip to the store to purchase supplies and basic material. For the device of the floor you will need tiles, the marking of which will indicate the silhouette of the sole. Novice masters should not get carried away with small tiled elements, central ornaments, the diagonal arrangement of tiles that are unnecessarily complicated in the absence of experience.

Note. Taking into account the necessary cutting and the probability of accidental damage to the elements, 15% should be added to the number of tiles calculated by the area of the room.
You will also need glue, selected taking into account the type of rough surface, the tile itself, the presence of a heating system, if it is built into the floor structure. You will need a primer, plastic crosses to form even seams, a level gauge and gloves. For the installation of floors in bathrooms, showers and the kitchen, it is advisable to buy polyethylene, used as a waterproofing, or bitumen mastic.
Base preparation
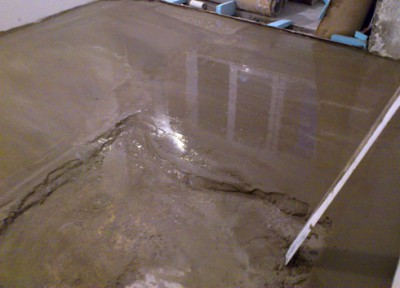
In order to planned ceramic tile laying do it yourself with the expected result, the rough surface must be prepared. Floor tiles can be glued on top of a clean, dry, grease-free cement or polymer screed, on top of a concrete floor and wooden base, leveled with GVL or sheet plywood.
The surface of the base floor is recommended to be treated with waterproofing mastic or coated with polyethylene.The cement base should be primed to ensure maximum adhesion and to strengthen the structural bonds of the upper layer.
What glue to choose for the tile and how to correctly calculate its consumption, read in our material:https://floor.techinfus.com/en/pol-pokritiya/plitka/vybiraem-klej-dlya-plitki.html.
Markup
It is better to start gluing the tiles from the side conjugated with the wall opposite the entrance opening. If the styling scheme is without any special effort, it is enough to mark the edge of the first row, then the subsequent rows, with a coated painting cord. Those who plan to glue the tiles diagonally or lay out any pattern need to find the center of the room. In such cases the masking cord is pulled between two points located in opposite corners. Four times the angle, there will be two lines, and their intersection point will indicate the desired center of the room.

a - in straight lines
b - diagonally
Tip. First, without glue, lay out the elements on the surface to determine in which place it is better to place the trimmed tile. A kind of "fitting" will also help those who decided to lay out the ornament.
Then you need to study the technology of gluing floor tiles. You can watch a video about how tiles are laid with their own hands - a video at the end of the page that will help to get a visual representation. With a heavy baggage of knowledge, any enterprise will pay dividends.
Floor tile laying technology
The beginning of the work will be the preparation of the adhesive mixture in full compliance with the briefing attached to the dry composition. To obtain a homogeneous mass without lumps, the powdered material is poured into a container with water and mixed using a construction mixer or a drill with a specific nozzle.
Note. Do not immediately cook a lot of glue. From contact with air, the solution begins to harden and lose elasticity.
Mixing is performed in two steps, between which a ten-minute break is made for the gradual entry of all molecules of the mixture into contact with water.
The glue is ready, pick up a spatula with large teeth and get down to business.
Tip. The spatula-comb is chosen, focusing on the dimensions of the tile. For large floor tiles, large glue ridges will be required. The width is set by the comb, and the height can be adjusted by holding the spatula at different angles. The standard angle is 45º, but the larger the angle, the deeper the relief.

- Glue is best applied to a small area of the floor (no more than 0.8 × 0.8 m, in another dimension it is a segment for 4 elements). Kohl laying tiles with their own hands is done for the first time, so far you should not dream about high production rates. It is better to pay attention to the acquisition of skills, and having perfected the skill, you can subsequently increase the speed.
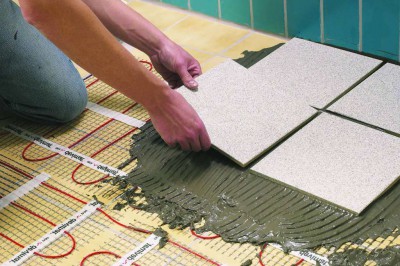
Note. The glue is applied to the surface to be trimmed with the even side of a spatula, then a comb relief is formed with the teeth side. The ridges will help to evenly distribute the binder material on the back surface of the tile and improve adhesion.

You can learn more about the features of laying tiles with your own hands and the subtleties of the work from the material on our website:https://floor.techinfus.com/en/pol-pokritiya/plitka/ukladka-kafelya-svoimi-rukami-video.html.
- Turning the tile slightly left and right, which is done to evenly distribute the binder, the element is fixed according to the outlined marking and according to the planned level of coverage. It is not necessary to strongly displace the tile floor element. For reliability, you need to tap on the front surface with a mallet handle, rubber or wooden hammer.
- The following elements are laid, gradually filling the space in rows. They recommend laying out a full row to the wall.But the direction can be chosen on the basis of personal convenience.
- After fixing each tile, it is necessary to check compliance with the horizontal level by applying a simple beam or spirit level to two or more elements of the lined surface. Horizontal deviations are corrected by adding or removing excess glue.

Please note: DIY mosaic tiles are laid according to the same rules. But not individual small-caliber elements are glued to the rough surface, but a whole sheet with mosaic details fixed on the grid. Horizontal mosaic is not aligned with spirit level or timber, but with a sheet of plywood.

- In all connecting seams, you need to install plastic crosspieces. With their help, smooth beautiful technological gaps are formed. They will provide the tile with enough space in case of heat shifts. A 1 cm gap should also be left along the contour of the room, provided by the installation of small wooden wedges. Crosses made of plastic must be removed when the adhesive begins to harden.
- It is desirable to place the trimmed elements in the areas of installation of plumbing, cabinets, nightstands, etc. It is better to trim a thick floor tile with a grinder with a diamond disk, since the tile cutter leaves an uneven ugly edge.

When working with ceramic tiles, trimming of material cannot be avoided. You will learn about how to do this correctly and about the features of cutting with various tools from the article:https://floor.techinfus.com/en/pol-pokritiya/plitka/kak-rezat-plitku.html
- At the intersection of the pipeline cover for a beautiful trim, you need to make a template of cardboard in full size. The hole in the tile will be oval, to fill the area between the wall and the pipe, you will need to cut an additional piece of tile.

In a day it will be possible groutwhy use a rubber spatula. After half an hour, the excess grout is removed with a damp cloth, and the joints treated with it will need to be moistened a couple more days.
After a week, it will be possible to remove the wedges installed along the contour, fill the hole with chopped rubber or expanded polystyrene and lay the baseboard.
Video instructions and tips from the masters
For those who carefully comply with technological requirements, do not try to make adjustments to the instructions of the manufacturers of glue and soil, but strictly follow the recommendations, laying the floor tiles with their own hands will be a real victory over themselves and over the representatives of sultry Tajikistan. Surely it will turn out no worse than that of visiting "craftsmen". There will be no particular complications in the work, but a lot of diligence will be required. And the efforts not to take away from the owners who want to finish personal space with their own hands.
4 comments