
Warm floor on a wooden floor: an example of a water system on logs
New technologies are always the subject of debate and debate. For example, there is an opinion that a warm water wooden floor is an extremely complex and, in some situations, almost impossible process. In fact, this statement does not find confirmation in real life. Moreover, in the framework of this article we will take the liberty of providing complete information on how to cope with this wonderful technology on our own to a person who does not have a special construction or engineering background. Believe me, with the right selection of materials and the right technology, as well as a huge desire, everyone will be able to create a warm floor in their home with their own hands.
Before you begin to familiarize yourself with our instructions, we recommend that you watch thematic videos. Perhaps after this it will be easier for you to single out the most difficult stages of this work and to analyze them in more detail.
In principle, today the choice of warm floors is limited to two types: water and electric. Immediately make a reservation that the electric version did not find a big response from the consumer audience when working with a wooden base. Note that we are talking about a special current-carrying system, which is connected by very thin heating mats. Sometimes, instead of mats, a cable or heating film is used - it all depends on the required power of the warm floor.
In the vast majority of cases, having carefully studied both variations of the warm floor, when it comes to wood floors, the system prefers wooden water heated floors. In this case, we are talking about a system of pipes hidden under a wooden floor covering, inside which the coolant circulates - water.

Important! From a technical point of view, there are no problems installing a warm floor on an old wooden floor. At the initial stage, the most important thing is to clarify what the top floor covering will be like, for example, natural parquet or another wooden surface. About its technical parameters it is better to consult the seller of flooring.
Content
Key features when installing the system
If this is your first time encountering such a job, then you need to familiarize yourself with the most significant aspects of the technology. Alas, the basis of any practical undertakings is theory. Therefore, before making a wooden floor warm, take into account some details.
We evaluate the basis
The boards of the wooden base should be as close as possible to each other - if there are cracks, then they must be removed with the help of a heat-insulating material. However, if you can see with the naked eye that the wooden floor has physically exhausted itself, then it is better to dismantle it. When is this really necessary? In the following cases:
- The floors do not have insulation - the wind “walks” under the boards.
- The lags on which the boards are fixed are very rarely located relative to each other. The warm floor on the wooden logs suggests their location at a distance of 60 cm.
- The board of an old wooden floor needs processing on a planing machine - the exact thickness must be observed.This is necessary if the top coating is made of laminate. The fact is that its manufacturers recommend laying the material on the basis of bumps, which will not exceed 2 mm. And since the use of the substrate is not provided for in such a floor configuration, the surface of the base should be aligned to the maximum.
I want to heat the room with a warm floor and at the same time prefer a soft coating, but the question is whether it is possible to mount such a system? Let's talk about this in the article:https://floor.techinfus.com/en/pol-pokritiya/mozhno-li-teplyiy-pol-pod-kovrolin.html.
Pre-insulation of the floor
After the distance between the lags is brought to 60 cm, it is necessary to begin the installation of a raised floor. To do this, plywood or a used board or something else suitable for laying insulation on it is nailed to the lags from below. Then, between the logs, a heater with a thickness of 100 mm is laid, however, first, from below, and then from above, it is protected by a vapor and water protective film.

Attention! It is not recommended to use a conventional film as protection - this will inevitably lead to the formation of condensation and the insulation will constantly be wet.
Slab mineral wool with a density of 35-40 kg / m will perfectly cope with the insulation function3. Today, the offer on the market for this material is extremely wide, so there are plenty to choose from.
We lay a floorboard
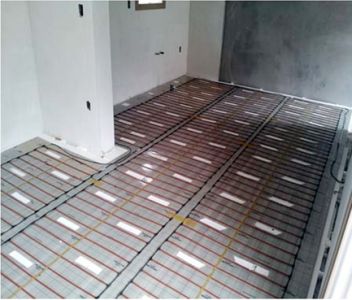
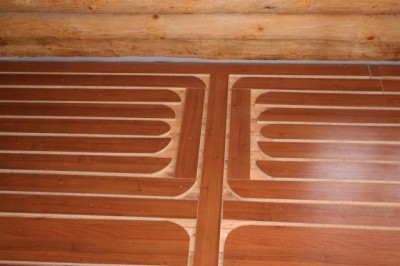
This process is carried out taking into account one circumstance - a groove measuring 20x20 mm should be formed between the boards. But on the edges of the boards at the ends, it is necessary to make round grooves intended for wrapping pipes. In principle, everything - the preparatory phase, which involves the wooden water floor heating system is completed, is completed. If everything is done rationally, then all these activities will take 10-12 hours.

Which of the underfloor heating systems you would not choose, it is very important to correctly draw up a layout of the pipes or connections - it is a guarantee of uniform heating of the room. You can read about what schemes are and how to connect everything correctly on our website:https://floor.techinfus.com/en/tepliy-pol/sxema-podklyucheniya-teplogo-pola.html.
Pipe laying technology
Rolls of rolled foil are rolled out above the longitudinal grooves, and on top of it directly into the grooves plastic pipe diameter 16 mm. Then the pipe must be wrapped with foil, the edges of which are attached with a stapler to the board.
To avoid popping the pipe with the foil out of the grooves, you need to attach it with small metal plates to the floor. The arrangement of the plates with respect to the grooves is transverse. Thus, the pipe is laid over the entire floor area.

Connection to the heating system
The last most important and important step is to connect the system to a common heating system. In this case, you can focus on the simplest, which is called "no problems", the way to perform this operation - manual regulation. Underfloor heating on wooden beams can be connected by any other method: using mixing units, using a collector system, etc. In principle, there are quite a few floor heating control systems.
The comb for underfloor heating is a single unit that controls closed heating circuits. You can read more about it in our special material:https://floor.techinfus.com/en/tepliy-pol/grebenka-dlya-teplogo-pola.html.

Note! Under no circumstances can a water floor heating be connected to a centralized (city) heating system without going through preliminary approvals and developing serious projects. For this reason, such floors are produced in private homes.
Having completed the connection, of course, it is necessary to pay attention to crimping the system for leaks or damage to the pipeline. This procedure cannot be skipped in any way, in order to avoid future unpleasant surprises in the form of expanded flooring.
Flooring
There is no need to dwell here in detail, just for this you will need another article. There are so many floor coverings now that everyone, at his discretion and financial capabilities, can choose one of them without much hassle. For example, if a laminate is so popular today, then it will take another 2-3 days to lay it, while financial costs will be relatively small.
Important! Any floor material is characterized by its coefficient of thermal conductivity. So the heat-conducting function of wood is much lower than ceramic tiles. Therefore, before installing a warm floor on wooden beams, it is very important to correctly calculate the required amount of heat already on the surface of the floor covering.
As you can see for yourself, a water-based wooden floor, which is often available in a completely wooden house, is a very relevant and effective heating system. And its installation is really within the power of literally everyone.
4 comments